Surveillance and Ubiquiti Video

My upcoming new office and home-lab space has inspired me to review some of my past technology choices.  The first review comes in the form of video monitoring.

The setup I’m using at my current home involves a NightOwl 16-camera DVR with cheap BNC cameras.  I was very pleased with it until I went to extend or even check for software updates… then I hit a serious brick wall!  I learned it is basically a cheap DVR that hasn’t been updated in, at least, a decade.  Well behind the curve for this tech geek.  Time to upgrade!

I began my research where I began… a DVR, but this time I’d have it professionally installed.  Well… the cost started to pile up very quickly.  At the end of the quote, each of the 7 cameras were going to cost $450 each!  That is insane!!  Back to the drawing board.

Having a fondness for networking, I started researching IP cameras again.  I’ve played with IP Camera software before (Blue Iris) and figured if I ever started over, I’d go that route.  My research quickly brought me back to them as a possible option.  I also discovered that my Synology NAS had a plugin Surveillance Station.  Ultimately I realized that IP Cameras were the direction I wanted to go and this was perfect timing for our new home construction.  I switched from the DVR/cameras to purely Cat6 network drops.  IMG_0065Tons of IP Cameras had PoE capabilities so I wasn’t concerned with powering them.  On the plus side, IP Cameras may range in price… but even the best options are below $450 per camera.

After research, I ordered a camera I thought had all the interesting features… A Ubiquiti Unifi G3 Dome camera.  Picked for the fact that it was an IP Camera, Wide angle lense and PoE.  Initial review… I am blown away by this camera, quality and features.

IMG_0066

It all starts with their software.  It requires either one of their NVR devices to connect, record and manage the camera or a Windows, Ubuntu or Debian computer running their NVR software which is free.  I installed it onto my workstation since I’m currently evaluating… and connected to the camera almost instantly.

I installed their iOS app and it was effortless to point it at my workstation where the NVR software was running and start viewing the camera.  This software blows NightOwl out of the water and well it should as NightOwl’s app is old as dirt.

I have only scratched the surface of what this camera and software can do… but I will be modifying my network diagram to include a custom built Ubuntu 1U server with DVR hard drives to run the NVR software locally.  Plus side, is the Ubuntu server I’m designing can be managed from my Tanium infrastructure and all the benefits that goes with that are included with this setup.

As a treat, here are a few of the images I captured from the iOS software after connecting to the Workstation NVR.

IMG_0074IMG_0073IMG_0071IMG_0069

Tanium Client Deployment Tool

I have recently stood up a half-dozen virtual servers in a new home lab I am building to compliment my home office.  This means I want to get the Tanium Client installed onto these endpoints.  Rather than do it manually, I’m choosing to use the Tanium Client Deployment Tool and install them remotely from my windows workstation.  At the time of this writing v5.0.0.6 was the latest and has a few essential features required for installing the agent onto my new non-windows systems.

Installing the Tool

Installation of the Client Deployment Tool is relatively straightforward.  Launch the installer and click “Install”.  Assuming the default installation directory is acceptable.

cdt1

cdt2

cdt3

Initial Tool Setup

Once you launch the tool there are a few things that need to happen.  The first is the tool itself will prompt you to download the very latest agents for the various OS platform Tanium supports.  Allow that to happen…

cdt4

cdt5

Next we will need to point the tool at our server infrastructure in two ways… First by pointing the utility at our tanium.pub file.  This file can be found in the Tanium Server root folder on the server.  Second we’ll need to specify the hostname or IP address of the server we will be pointing endpoints at.  This second value could be the hostname or IP address of a zone server or even an alias that functions differently inside and outside your network.  Lastly if you chose to use a port number other than the default 17472, you’ll need to specify that now.

Install the Agent

For this article we will deploy the Tanium Agent to one of my new Ubuntu 14.04 LTS virtual servers.  My user account on that box has sudo permissions and that is required in order to install new software.

cdt6

Next we will specify a single endpoint to deploy too.  To do that we change the lower-left tabs to “Computer List” and type in the hostname of the targeted endpoint.  Then change the very bottom left dropdown to “Linux_Mac_Only” to avoid unnecessary timeouts by trying a windows connection and hit the “Analyze” button.

cdt7

If all works well our tool will report back “Client not installed”.  Select that row and click “Install”. 

cdt8

All done… The client deployment was successful.  To validate, we can simply log into the Tanium Console and check Administration->System Status to see our new endpoint listed and reporting in.

cdt9

In Conclusion

The Client Deployment Tool is a great utility for getting the Tanium Agent installed on your endpoints fast.

Add Intelligence to your Home

home_automationI hobby in home automation and love to fiddle around with my home’s system.  As such, I was recently asked to design a system for someone’s new home. New to them, but the home is considered an “existing” home since it is fully built.  This is important to remember when designing a home automation solution for someone.

The following is what I recommended to them, figured you guys would be interested in some of the decisions I’d made regarding their new HS solution:

———————————————————–
Wireless Internet Router:
Before I decided on a business class non-wireless router… i was looking seriously at this one:

ASUS RT-ACU Dual-Band ($192.99) http://www.newegg.com/Product/Product.aspx?Item=N82E16833320115

But that might be too expensive… so go with one of it’s cheaper models ($107.99): http://www.newegg.com/Product/Product.aspx?Item=33-320-062%20%20%20%20%20%20%20%20%20%20%20%20%20%20%20

Either one will set you up for wireless within the house. If you want to extend that coverage to a majority of your yard… consider going with a high-power wireless access point ($275): http://www.newegg.com/Product/Product.aspx?Item=N82E16833168099 This would extend your wireless coverage to a major portion of your yard.

If you’ll be adding a separate shop like your current one, you have two options for internet connections out there…

  1. Underground Wiring: http://www.platt.com/platt-electric-supply/Category-Cables-Cable-Outdoor-Rated/Honeywell-Genesis/50901008/product.aspx?zpid=611774
  2. Get a second outdoor access point to connect your house and shop together.

Reasons for connecting your shop…

  • a. you could setup a computer in the shop which is connected to a big screen TV. This could be a cheap one like the one for computer control… and it would run a program which puts the security system up on the TV.
  • b. Wireless internet would keep your cellular data usage on your phone low while you’re out there… pulling up video cameras takes a lot of bandwidth. If you’re on your cellular connection, better hope you have unlimited internet… otherwise be near a wireless access point.
  • c. If you choose not to run video surveillance wires to your shop… you can pick up wireless or wired IP cameras which will let you monitor them.

———————————————————–
Computer Control ~ $250
Would Need: PC, Controller, Modules — Cost: $159.94 + (each light) 38.81… plus shipping
You don’t need a super powerful system as the brain for your home. It basically does a lot of "watching" of sensors which is not particular resource intensive.

I’d go with something like this ($109.99): http://www.newegg.com/Product/Product.aspx?Item=N82E16883255979

To control stuff you’ll need a Z-Wave Controller ($49.95): http://store.homeseer.com/store/Aeon-Labs-Aeotec-Z-Stick-S2-Z-Wave-USB-Interface-P746C66.aspx

Appliance/Lighting modules to control desk lamps and such…

Other Z-Wave Recommendations

———————————————————–
Security ~ $250
Need: Alarm System Kit, Door/window sensors and Wire… Costs: $221 + (each door/window) $1.57 + (each motion) $15.55 + $40… + shipping

The security system comes in a kit with almost everything for the core system: http://store.homeseer.com/store/DSC-KIT32-219CP01NT-Hybrid-Wireless-Security-System-Kit-P1154C236.aspx (you’ll need the kit $213.50 + AC Power Transformer $7.50 + IT-100 Integration Interface $59.94 [get the it-100 interface if you’re doing the computer control])

Just because you pick and install the security system yourself doesn’t mean you can’t get professional security monitoring ($8.95/month): http://www.smarthome.com/alarm.html

SENSORS:
I’d also recommend wiring it yourself… it’s a hell of a lot cheaper, and I believe it is more reliable.

You’ll also need 4-conductor wire, for wiring the keypad to the box and computer if you wanted that.

Wireless sensors are a lot more expensive but saves a lot in labor
If you go wireless, you’ll require a wireless signal receiver ($55.18): http://store.homeseer.com/store/DSC-RF5132-433-PowerSeries-Wireless-Receiver-P1159C235.aspx

———————————————————–
Video Surveillance

You have two main options for video…

  1. Use a DVR which is a single purpose device and records connected computer for upwards of 1-2 weeks with the started 4-cameras. This option includes an iPhone app but it too is single purpose and can only view cameras, a separate app is required to for home control and remote security. This option can be WAY cheaper than option 2…
  2. Use wired or wireless IP cameras. This option is more expensive because each camera is a self-contained mini computer which connects to your wireless router or wired in using cat5 cable.

OPTION 1 – self contained DVR.
Need: DVR 4-camera Kit… Costs: $249 + $79… + shipping
I’d recommend you go with a DVR; this one is 8-channel with 4 cameras and wire included: http://www.newegg.com/Product/Product.aspx?Item=N82E16881192198

It doesn’t have a hard drive, so you’ll want to pick one up… 1Tb Hard Drive ($79): http://www.newegg.com/Product/Product.aspx?Item=N82E16822136776 (avoid Seagate since they can get really hot)

This DVR has 8 channels… so you can add 4 more cameras, includes wire, for only ($109): http://www.newegg.com/Product/Product.aspx?Item=81-339-014&ParentOnly=1

The DVR supports up to (2) 1Tb hard drives… Each camera will provide 30gigs of video every 24 hours. So with this 4 camera system… a 1Tb hard drive will support a week’s worth of video. If you add the additional 4 cameras, that’ll cut it to only 3.5 days, so get a second 1Tb hard drive to keep it at a week.

OPTION 2 – IP Camera, recorded on the computer
Need: IP Camera… Costs: $30 + (each camera) $100
If you want live monitoring this is great and can be fully integrated into the home control/security iPhone app and doesn’t require any additional equipment.

If you want to record it, then a cheap $30 software (http://www.blueirissoftware.com/) will turn the control computer into a DVR…just remember to get a large hard drive.

For wireless, I’d recommend getting the more expensive router or the outdoor one since video is bandwidth heavy.

Lots of wireless cameras are available here (avg $100/ea): http://store.homeseer.com/store/Netcams-C194.aspx

For wired cameras, use the Foscam wide angle ethernet cameras ($105): http://www.newegg.com/Product/Product.aspx?Item=9SIA1R00M31192

Foscam also has a wired/wireless version, but not wide angle ($95): http://www.newegg.com/Product/Product.aspx?Item=9SIA1PK0MG8083

I would highly recommend wide angle… it distorts the image but shows you more without having to push the camera further away from your target.


If you have recommendations, alternatives, or just want to comment, leave it below… I respond to all, but spam.

Installing BigFix.me MDM onto your iOS devices.

The following step-by-step process demonstrates how to install/configure MDM on your iOS devices… iPhones, iPods, and iPads.

1. Visit https://bigfix.me using your mobile device. Step 1 of 13
2. Click "Continue to this website (not recommended)" if prompted. Step 2 of 13
3. Click the "SSL certificate" link towards the bottom. Step 3 of 13
4. Click the "Install" button on the "Install Profile" screen. Step 4 of 13
5. Click the "Install" button on the "Warning" screen. Step 5 of 13
6. If you have a password set, you will need to enter it now and hit "Done". Step 6 of 13
7. Click the "Done" button on the "Profile Installed" screen, you will be returned to Sarfari. Step 7 of 13
8. Enter your email address, choose Device Ownership value and click the "Enroll" button. Step 8 of 13
9. Click the "Install" button on the "Install Profile" screen. Step 9 of 13
10. Click the "Install Now" button within the popup box. Step 10 of 13
11. If you have a password set, you will need to enter it now. Step 11 of 13
12. Click the "Install" button one more time for the "Warning" screen and your done. Step 12 of 13
13. Click "Done" and your all finished. Step 13 of 13

TEM SUA Upgrade 1.3.0.592 –> 1.3.1.597

Lately I released an article on installing Tivoli Endpoint Manager’s add-on product Software Usage Analysis (SUA) v1.3.0.592.  Well… we have release another upgrade and here’s how you can upgrade your installation:

Launching the installation is pretty easy… unlike the initial installation, there is basically one “step”.  Launch the installer:

SUA_Upgrade_1

SUA_Upgrade_2

Typical license agreement stuff.

SUA_Upgrade_3

SUA_Upgrade_4

SUA_Upgrade_5

Since this is an upgrade, we are good about warning you that no one will be able to access the GUI interface at this point.

SUA_Upgrade_6

We’ll need to confirm the user account that is being used for the services here.

SUA_Upgrade_7

SUA_Upgrade_8

I ran into one little problem where but it was due to service account permissions to the database.  After adjusting them for the duration of this install, the installation continued.

SUA_Upgrade_10

SUA_Upgrade_13

SUA_Upgrade_14

SUA_Upgrade_17

SUA_Upgrade_19


The installation went well with just the one permissions based hiccup.  To confirm installation was successful simply log into the GUI and look at the bottom right for version and catalogue numbers.

SUA_Upgrade_20


If you have any questions or comments, please leave them below.

To view all of the images from this upgrade visit:  http://www.flickr.com/photos/danielheth/sets/72157629743080378/

NEW Tivoli Endpoint Manager OS Deployment 2.2

IBM just announced the release of our new Tivoli Endpoint Manager for OS Deployment version 2.2!

This release has two new features:

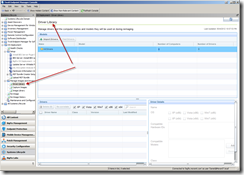
  • Driver Management – A new dashboard was added that will allow you to upload and manage drivers that would be used during an OS reimaging.
  • Bootable Media Creation Tool – will allow you to create self contained bootable media for imaging offline for bare metal needs.
  1. A New Driver Library Dashboard:image
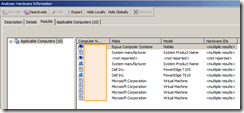
  2. New Analyses:
    image
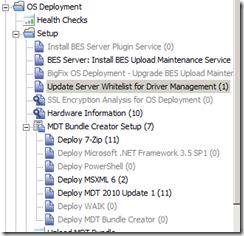
  3. New Fixlets… Deploy MDT Media Creator and Update Server Whitelist for Driver Management:
    image

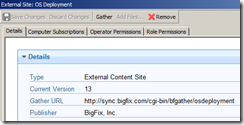
Look for version 13… to get these latest updates:
image


If you’re looking for more information… visit us over on the IBM forums:

https://www.ibm.com/developerworks/forums/thread.jspa?threadID=427062


Adding LDAP Authentication to the TEM (BigFix) Console

The latest version (8.2.x) of Tivoli Endpoint Manager comes with it the ability to authenticate console users with your LDAP directory.  Here is a simplified step-by-step guide for setting that up.

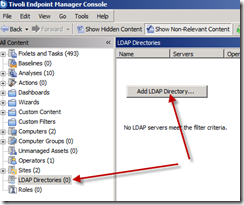
Open your console and use one of your Master Operator accounts.  Find the LDAP Directories branch in the left side tree and right click it.  Choose to Add LDAP Directory from that list…

image

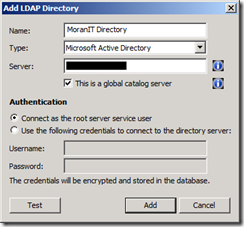
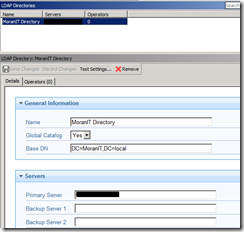
Enter any “Name” you’d like and specify your LDAP authentication server as well as if it is a global catalog server.  In my tiny network, I only have the one DC.

image

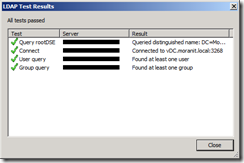
Click the Test button to validate the connectivity…

image

My network is very tiny, however I would encourage you if alternate DC servers are available to specify them in the Backup Server X spaces provided.

image


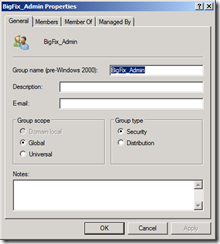
Adding the link to the DC is one step… next you’ll probably want to create a special AD group which Console users will belong.  Remember that within TEM, we have Console Operators and Master Operators.  Each user/group has a specified set of computers they are responsible for and this can be extended into AD.  Simply create a AD user group for how your organization is divided and based on their required level of console access.

In my case I created two AD groups:  BigFix_Admin and BigFix_Console.  Then added my user account to the Admin group.

image


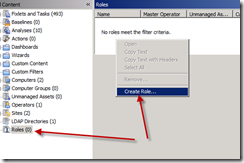
Our next/last step is to specify the level of access each of these new AD groups have within the TEM infrastructure.

image

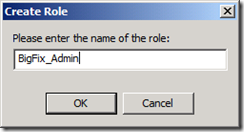
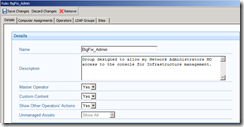
You can name this new Role anything you’d like, however I like to match the AD group name up with this Role name to make it easy to understand.

image

My Admin group has near unlimited privileges… thus I’ll chose yes to the following options:  Master Operator, Custom Content, and Show Other Operators’ Actions.

image

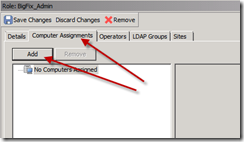
Next we’ll need to assign the computers that this group will have control over… in my case I’ll be specifying “all computers”

image

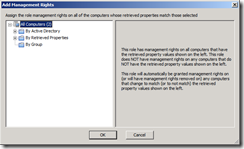
Using this dialog I can specify individual computers as well as systems based on Retrieved Properties or Group Membership.

image

I will not be adding TEM users to this group as it was setup specifically for my LDAP Admin group… so I’ll skip the “Operators” tab.

image

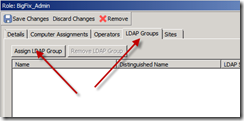
Instead I’ll be focusing on the LDAP Groups tab… and Assigning LDAP Group to this TEM Group I’m currently defining…

image

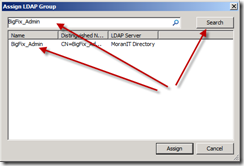
Search for the group to be added to this TEM group, and Assign it.

image

image

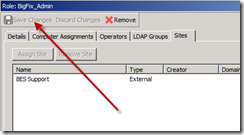
Lastly I’ll glaze over the Sites tab since I currently only have 1 site in this new infrastructure, however I can specify specific site permissions just like I can for TEM users.

image

Don’t forget when you are done to Save Changes…

image

Since this is a fresh installation, the setting which requires entering your authentication password to authorize this new action has been disabled by default.  In a different article I will explain this very cool security feature, how it works and how to force the password requirement just like in previous versions.   For now, let’s log in with my Domain credentials to test things out!

image

image

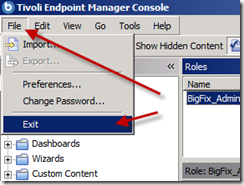
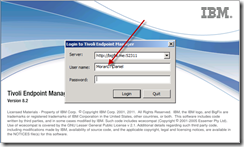
Let’s re-launch the console but this time using my Domain credentials…

Be sure to include your Domain within the User name field…  In my case it’s “MoranIT\Daniel”

image

Success!!  The authentication was accepted and I’m logging into the console!

image

Something very important to notice here is that my operator site and account was automatically generated upon login.  This means that if too many new users login it could cause network traffic on your network since a subscription action is deployed to the authorized computers list.

image


Enjoy your new LDAP authenticated user access… let me know if you have any questions or comments in the section below.  I respond to all my comments, so please engage…

Installing Tivoli Endpoint Manager (BigFix) Console 8.2.1093

My latest installation of the TEM v8.2.1093 server comes with it the installation of the Console.  This new console is extremely cool and has features like LDAP authentication, HTTP communications channel, and more.  Here is the basic step-by-step installation procedure to get the client installed on your workstation.

image_thumb[44]_thumb

image_thumb[45]_thumb

image_thumb[46]_thumb

image_thumb[47]_thumb

image_thumb[48]_thumb


If you have any questions, let me know!