Configuring Windows Update with Tanium

There really is only two ways to configure the Windows Update Agent:  Manually through UI or the Windows Update API.  Unfortunately as an enterprise admin, you need to use command line utilities to configure endpoints and Microsoft does not provide that.  Thus, I’ve put together a really quick command line utility that uses the Windows Update API to allow you to configure using our favorite platform… Tanium.

Download Solution Pack

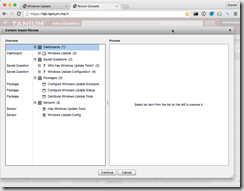
First thing you must do is download the entire Tanium solution pack for Windows Update.   Once you’ve downloaded the Windows_Update.xml, you must import it through your Console->Authoring->Import Content.

wu1

You’ll find it contains multiple sensors, packages and saved questions for reading and changing the configuration.

Ensure Package Files Download

wu2One of the packages requires external files that are downloaded from files.danielheth.com.  These files are served up via https and thus you must configure my Certificate Authority in order for your Tanium Server to properly download from that location.  You must also configure a White Listed URL as well.  You can read more about doing this at https://danielheth.com/2015/02/02/secure-downloading-of-package-files-with-tanium/

OR you can simply download the three files manually and update the Distribute Windows Update Tools package.  We will explore this second option in this article:

Download all following files:

  1. https://files.danielheth.com/7za.exe
  2. https://files.danielheth.com/install-wu4tanium.vbs
  3. https://files.danielheth.com/wu4tanium.zip

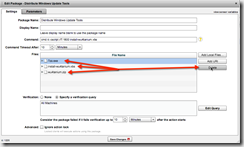
Then edit the Distribute Windows Update Tools package by going to Console->Authoring->Packages, filtering by “Distribute Windows Update Tools” and edit the correct package.  Then “Delete” all three files linked to this package…

wu3

Now we will “Add Local Files…” for each of the three files we downloaded earlier.

wu4

Now that we have all three “local” files uploaded into the package we’re ready to start using this solution…

Windows Update Dashboard

Included in the solution pack is a new dashboard which groups all the functionality together in a single location.  Browse to that dashboard by looking under “Other Dashboards” and finding the one called Windows Update.

wu5

As you can see from the screenshot, there are two included saved questions.  One lets you know about the installation status of the special utility we’re using and the other uses that utility to return the current status of the Windows Update Agent using the API.

Deploy Windows Update Tools

I already have one system deployed with the utility, but my other 9+ systems do not have it.  I can drill down to determine what the names of these systems are and distribute to specific machines, but I want my entire infrastructure to have this utility.  Thus I will right click on the “No” answer and deploy the package we edited before, the Distribute Windows Update Tools package.  Complete the deployment of that action and within 10 or so minutes, you should start seeing the Windows Update Configuration appear in the right answer grid.

wu6

Configure Windows Update Status

The Windows Update Agent has a few modes of operation:

  • Not Configured means “not configured” by the user or by a Group Policy administrator.  Users are periodically prompted to configure Automatic Updates.
  • Disabled is self explanatory… Users are not notified of important updates for the computer.
  • Notify Before Download prompts users to approve updates before it downloads or installs the updates.
  • Notify Before Installation will download the updates but prompt users to approve the updates before installation.
  • Scheduled Installation will automatically install updates according to the schedule that is configured by the user or by the wu4tanium utility.

To make changing this mode-of-operation status easy, I’ve included a Configure Windows Update Status package with the above described options.  Select the configuration answers that are not configured as you want and launch this package to change it.

wu7

Configure Windows Update Schedule

If you chose to schedule the automatic installation of updates you can use the Configure Windows Update Schedule package to change the day and time updates will install.

I would like all my systems to download and automatically install updates every day at 1am.  To do that, select all the configurations that do not match your desires, Right click and Deploy Action.  Select the Configure Windows Update Schedule package from the dropdown and two parameters will appear.  One to specify the day of the week and the other the hour.  The hour is specified in 24-hour “military” time and is only configurable for on-the-hour.

wu8

After 10 minutes, the Windows Update Configuration answer grid will start updating with the newly configured schedule.  The Windows Update Config sensor is set with a max age of 10min, thus we must wait that long before the sensors script is executed again and the new configuration starts appearing in the answer grid.

Conclusion

I hope this helps those of you who wish to use the Windows Update Agent to update your systems rather than using a more involved patching solution. 

Note that this solution DOES NOT USE the Tanium file/shard downloading functionality… each endpoint will download updates directly from Microsoft.

Also I have only tested this on Windows 7 systems.  It is possible the Windows Update API will not function as coded on other versions of Windows.  If you wish to view the code for the wu4tanium utility, it is available on github.  Feel free to fork that project to add functionality or compatibility with other versions of Windows.
Allow Windows Update to do more than just Windows

I like to have updated software on all of my computers.  Everything from patches to bug fixes are very important to my security profile.  Thus I allow Microsoft to update more than just Windows when I activate the Windows Update feature.  Here is a quick and easy way to activate that additional functionality.

image

image

image

image

Since I’ve never before given Internet Explorer to make changes to my system, a security popup has activated asking if it is ok… just hit yes.

image

Windows Update now starts it’s scan of additional software it has updates for…

Now wasn’t that easy…  Leave your comments and suggestions below!

Slipstreamed Windows XP CD Using SP2 and SP3

Microsoft puts out updates every now and then in the form of a Service Pack.  Service Packs are a rollup collection of updates.  If you are a system builder or frequently need to reinstall the operating system slipstreaming is an easy way to speed up the reinstall process.  I’ve researched the following procedure for easily slipstreaming our our XP CD, however you can easily use this process for other operating systems like Windows Vista or Windows 7.

Prerequisites’

You’ll need to collect some simple things… download the Service Pack you want to integrate into the CD you have.  Our office uses PowerISO to manipulate CD images… so I’d suggest purchasing it over at http://www.poweriso.com, it’s only $30.

I take ISO images of all of my CDs, that way I don’t have to mess with CD’s…

XP SP2:  http://www.microsoft.com/downloads/details.aspx?FamilyId=049C9DBE-3B8E-4F30-8245-9E368D3CDB5A&displaylang=en

XP SP3:  http://www.microsoft.com/downloads/details.aspx?familyid=5B33B5A8-5E76-401F-BE08-1E1555D4F3D4&displaylang=en

If the links are broken, simply go to http://www.microsoft.com and within the websites’ search bar put “download Windows XP SP2” and you’ll easily find it.

Part 1:  Building Directories

The first step is to build a directory structure to hold the files that will be used in the CD creation process. It’s a simple structure, requiring nothing more than a few folders.  I created the folders shown below, located on Drive C, and using PowerISO, extracted the XP-SP1 CD-image I wanted to work on to the first directory.  Then download the SP into the second directory.

c:\XP
c:\XP-SP

Part 2:  Copying and Extracting Files

If you downloaded Windows XP SP2 from Microsoft, it will most likely be named WindowsXP-KB835935-SP2-ENU.exe. Copy the file to the c:\XP-SP folder if it wasn’t downloaded there initially.

Open a cmd prompt, browse to the c:\XP-SP  directory and execute the following command:  WindowsXP-KB835935-SP2-ENU.exe -x

image

image

The prompt for where to store the extracted files shown here will open. I used the default c:\XP-SP.


Part 3: Updating The Windows Share

Apply the extracted Service Pack to Windows XP files in the XP folder that were copied in Part 2 as follows:

Within the open cmd window, browse to c:\XP-SP\i386\Update and execute the following command: Update.exe /integrate:C:\XP

image

As shown below, Service Pack 2 is being integrated into the Windows installation folder.

Successful completion of the integration process.


Your now all set… delete the c:\XP-SP directory and your c:\XP directory now contains Windows XP with SP2.  Repeat the process for SP3…

Part 4:  Creating a bootable CD

The last step is to turn the newly updated files back into a CD-Image. 

This is real easy if your using PowerISO… simply open up the XP-SP1 CD Image and drag-n-drop the c:\XP\*.* files into the root of the image.  Then choose File->Save As    Rename it XP-SP2 and your all done.

Enable Remote Desktop Remotely

If you need to remote access a Windows XP professional workstation and the computer Remote Desktop is not enabled you may have an option to enable Remote Desktop remotely by using regedit.

To enabling Remote Desktop using regedit, follow these steps:

  1. Run REGEDIT from Start>Run
  2. Click on File, then select Connect Network Registry
  3. Type the remote computer IP or host name in the Enter the object name to select and the click OK.

4. If you don’t have permission to access the remote computer, the logon screen will show up. Type the username and password for the remote computer. Then click OK.

5. Now, the remote computer is listed in the Registry Editor.

6. Browse to HKEY_LOCAL_MACHINE\SYSTEM\CurrentControlSet\Control\Terminal Server, in the right panel, select fDenyTSConnections (REG_DWORD). Change the value data from 1 (Remote Desktop disabled) to 0 (Remote Desktop enabled).

7. Close the regedit.

Windows Azure and Me

Hello everyone… well, another new product released by Microsoft.  This one has potential though…

Windows Azure is basically an operating system for an entire data center.  Yup, much like the OS on your desktop that manages the hardware for you as you write programs on-top… Azure manages the data-center tasks of distributed computing, load balancing, scalability, and more…

Now comes the question… how does this relate to me?

Well that one I’ve been pondering for a long time now.  During my divorce at the beginning of the year, i set out to strip my life to the essentials, ridding it of all the annoying aspects that have plagued me over the past 10 years.  As it turned out this was a business that didn’t give me the lifestyle I was wanting. 
My job for a vendor at the worlds largest retailer, Wal-mart, did however.  I now enjoy a simple 8 hour work day managing 4600+ windows servers in one of only a few data-centers of this scale.

In the process of simplifying my life, I have stripped away all projects and extra tech things to only one project.  My Home Media Network… where i have near instant access to every movie, TV show, and video I have in my collection.  This project is a rousing success… not a problem in the world… except the money to supply my need for entertainment… IE:  buying new shows and movies to add to my collection.

Here’s the problem as I see it.  I am an intelligent person, skilled in the aspects of business operations, technology and how it relates to a business experience.. but I don’t know what my next project should be.

I need an award winning idea to run with…  give me something simple like the website Twitter or complicated like a picture sharing website… I need an original idea that i can grow into something.

Being an intelligent person surely I can devote my time and efforts into a project that will permanently shed the need for a Job to support my lifestyle… something that eventually takes on a life of it’s own.  Something that will inspire the masses to contribute on a massive scale.  Hey, something as simple as getting one penny from every man, woman, and child in America at least once a year…

I need a project!