Configuring Windows Update with Tanium

There really is only two ways to configure the Windows Update Agent:  Manually through UI or the Windows Update API.  Unfortunately as an enterprise admin, you need to use command line utilities to configure endpoints and Microsoft does not provide that.  Thus, I’ve put together a really quick command line utility that uses the Windows Update API to allow you to configure using our favorite platform… Tanium.

Download Solution Pack

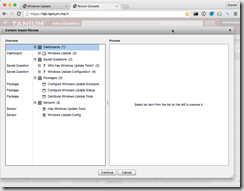
First thing you must do is download the entire Tanium solution pack for Windows Update.   Once you’ve downloaded the Windows_Update.xml, you must import it through your Console->Authoring->Import Content.

wu1

You’ll find it contains multiple sensors, packages and saved questions for reading and changing the configuration.

Ensure Package Files Download

wu2One of the packages requires external files that are downloaded from files.danielheth.com.  These files are served up via https and thus you must configure my Certificate Authority in order for your Tanium Server to properly download from that location.  You must also configure a White Listed URL as well.  You can read more about doing this at https://danielheth.com/2015/02/02/secure-downloading-of-package-files-with-tanium/

OR you can simply download the three files manually and update the Distribute Windows Update Tools package.  We will explore this second option in this article:

Download all following files:

  1. https://files.danielheth.com/7za.exe
  2. https://files.danielheth.com/install-wu4tanium.vbs
  3. https://files.danielheth.com/wu4tanium.zip

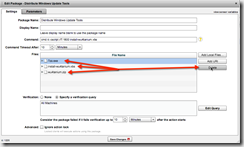
Then edit the Distribute Windows Update Tools package by going to Console->Authoring->Packages, filtering by “Distribute Windows Update Tools” and edit the correct package.  Then “Delete” all three files linked to this package…

wu3

Now we will “Add Local Files…” for each of the three files we downloaded earlier.

wu4

Now that we have all three “local” files uploaded into the package we’re ready to start using this solution…

Windows Update Dashboard

Included in the solution pack is a new dashboard which groups all the functionality together in a single location.  Browse to that dashboard by looking under “Other Dashboards” and finding the one called Windows Update.

wu5

As you can see from the screenshot, there are two included saved questions.  One lets you know about the installation status of the special utility we’re using and the other uses that utility to return the current status of the Windows Update Agent using the API.

Deploy Windows Update Tools

I already have one system deployed with the utility, but my other 9+ systems do not have it.  I can drill down to determine what the names of these systems are and distribute to specific machines, but I want my entire infrastructure to have this utility.  Thus I will right click on the “No” answer and deploy the package we edited before, the Distribute Windows Update Tools package.  Complete the deployment of that action and within 10 or so minutes, you should start seeing the Windows Update Configuration appear in the right answer grid.

wu6

Configure Windows Update Status

The Windows Update Agent has a few modes of operation:

  • Not Configured means “not configured” by the user or by a Group Policy administrator.  Users are periodically prompted to configure Automatic Updates.
  • Disabled is self explanatory… Users are not notified of important updates for the computer.
  • Notify Before Download prompts users to approve updates before it downloads or installs the updates.
  • Notify Before Installation will download the updates but prompt users to approve the updates before installation.
  • Scheduled Installation will automatically install updates according to the schedule that is configured by the user or by the wu4tanium utility.

To make changing this mode-of-operation status easy, I’ve included a Configure Windows Update Status package with the above described options.  Select the configuration answers that are not configured as you want and launch this package to change it.

wu7

Configure Windows Update Schedule

If you chose to schedule the automatic installation of updates you can use the Configure Windows Update Schedule package to change the day and time updates will install.

I would like all my systems to download and automatically install updates every day at 1am.  To do that, select all the configurations that do not match your desires, Right click and Deploy Action.  Select the Configure Windows Update Schedule package from the dropdown and two parameters will appear.  One to specify the day of the week and the other the hour.  The hour is specified in 24-hour “military” time and is only configurable for on-the-hour.

wu8

After 10 minutes, the Windows Update Configuration answer grid will start updating with the newly configured schedule.  The Windows Update Config sensor is set with a max age of 10min, thus we must wait that long before the sensors script is executed again and the new configuration starts appearing in the answer grid.

Conclusion

I hope this helps those of you who wish to use the Windows Update Agent to update your systems rather than using a more involved patching solution. 

Note that this solution DOES NOT USE the Tanium file/shard downloading functionality… each endpoint will download updates directly from Microsoft.

Also I have only tested this on Windows 7 systems.  It is possible the Windows Update API will not function as coded on other versions of Windows.  If you wish to view the code for the wu4tanium utility, it is available on github.  Feel free to fork that project to add functionality or compatibility with other versions of Windows.
Creating OpenVPN Server and Setting up OpenVPN Clients

I recently setup a remote office that houses my huge Virtual Host machine and wanted private/encrypted access to that network from where ever I am.  Thus I turned to OpenVPN as a solution after a little bit of research (see this BestVPN Article).  This article covers the basics of setting up an OpenVPN server on a Ubuntu server sitting behind a NAT firewall. 

Let’s start on the Ubuntu Server…
Enter root first…

$ sudo su

Setup OpenVPN Server

Starting with a Ubuntu computer you’d like to make the OpenVPN Server… Install OpenVPN and Easy-RSA

$ apt-get install openvpn easy-rsa -y

Certificates

The first thing to know about OpenVPN is we’ll be setting things up to use certificates.  It is the most secure method and requires you to manually distribute the client certificates and configuration files.  The method you choose determines the security.  Most secure is to hand deliver the certs on an encrypted thumb drive.

Certificate Authority

To setup your own Certificate Authority (CA) and generating certificates and keys for an OpenVPN server and multiple clients first copy the easy-rsa directory to /etc/openvpn.

$ mkdir /etc/openvpn/easy-rsa
$ cp -rf /usr/share/easy-rsa/* /etc/openvpn/easy-rsa/
$ vi /etc/openvpn/easy-rsa/vars

And, change the values that matches with your country, state, city, mail id etc.

export KEY_COUNTRY=”CountryCode”
export KEY_PROVINCE=”MyStateOrProvince”
export KEY_CITY=”MyCity”
export KEY_ORG=”Organization Name”
export KEY_EMAIL=”vpn@example.com”
export KEY_CN=MyVPN
export KEY_NAME=MyVPN
export KEY_OU=MyVPN

Enter the following to generate the master Certificate Authority (CA) certificate and key:

$ cd /etc/openvpn/easy-rsa/
$ cp openssl-1.0.0.cnf openssl.cnf
$ source vars
$ ./clean-all

Run the following command to generate CA certificate and CA key:

$ ./build-ca

Server Certificates

Next, we will generate a certificate and private key for the server:

$ ./build-key-server server

Client Certificates

Each client will need a certificate to authenticate itself to the server. To create the certificate, enter the following in a terminal while being user root:

$ ./build-key client

Generate Diffie Hellman Parameter

This is a unique key used for our VPN Server, Enter the following command to generate DH parameter.

$ ./build-dh
Go to the directory /etc/openvpn/easy-rsa/keys/ and enter the following command to transfer the above files to /etc/openvpn/ directory.

$ cd /etc/openvpn/easy-rsa/keys/
$ cp dh1024.pem ca.crt server.crt server.key /etc/openvpn/

Client Configuration File

We need to copy and edit the client configuration file.
$ cp /usr/share/doc/openvpn/examples/sample-config-files/client.conf /etc/openvpn/client.ovpn

Edit file client.ovpn,
$ vi /home/client.ovpn

Set the VPN server host name/IP address:

remote [public ip or hostname of your vpn server] 1194

Distributing Client Certificates

You must copy all client certificates and keys to the remote VPN clients in order to authenticate to the VPN server. In our case, we have generated certificates and keys to only one client, so we have to copy the following files to the VPN client.

ca.crt
client.crt
client.key
client.ovpn

You have to copy the above files to your VPN clients securely. Copy the keys with caution. If anyone gets ahold of your keys, they can easily intrude and get full access to your virtual private network.

Configuring VPN Server

Copy the file server.conf.gz file to /etc/openvpn/ directory.
$ cp /usr/share/doc/openvpn/examples/sample-config-files/server.conf.gz /etc/openvpn/

Extract the file using the following command:
$ gzip -d /etc/openvpn/server.conf.gz

Edit file server.conf,
$ vi /etc/openvpn/server.conf

Find and uncomment the following lines to route client systems traffic through OpenVPN server.

[…]
push “redirect-gateway def1 bypass-dhcp”
[…]

Also, Uncomment and change the DNS servers to reflect your own DNS values. Here I am using Google public DNS servers.

[…]
push “dhcp-option DNS 208.67.222.222”
push “dhcp-option DNS 208.67.220.220”
[…]

Uncomment the following lines:

[…]
user nobody
group nogroup
[…]

Save and close the file.

IP forwarding and routing Configuration

Edit sysctl.conf file,
$ vi /etc/sysctl.conf

Find the following line and set value “1” to enable IP forwarding.

# Controls IP packet forwarding
net.ipv4.ip_forward = 1

Run the following command to apply the sysctl changes.
$ sysctl -p

Enter the following command to enable IP forwarding:
$ echo 1 > /proc/sys/net/ipv4/ip_forward

Start OpenVPN Server

Finally, start openvpn service and make it to start automatically on every reboot using the following commands:
$ service openvpn start

Verify if VPN interface(tun0) is created using ifconfig command:
$ ifconfig

Network Router Configuration

We need to do two things on your router and how you do them greatly depends on your router.  I’m assuming you have a hardware router hooked up to your DSL, Cable or other type of internet connection and you’re setting up a Ubuntu VPN server on the internal network and want to access other computers on that internal network once your remote clients have authenticated into the VPN tunnel.

1. Your VPN server should have an internal static IP address… We need to tell your router to route all 10.8.0.0 traffic to your VPN server so when your VPN clients connect they can communicate with your internal network.

2. Open external port 1194 tcp and udp and point it at your VPN server’s internal static IP address.

Clients

Now we have the files needed to put on your clients, your server is all setup, and your router is configured correctly… it’s time to look at setting up clients.  I created a client certificate for each of my three workstations… each running a different OS:  Mac OS X, Ubuntu 14.04, and Windows 7.  I want to validate and connect into my VPN remote network from all three systems… but configuring their client is slightly different on each.  Below I go into details on setting each one up.

Ubuntu Client

I’ll assume you are using this system as a Ubuntu workstation/laptop and have a graphical interface… thus want to use Network Manager to connect in.  First we’ll need to install two items:
$ sudo apt-get install openvpn network-manager-openvpn

Navigate…
System Settings->Network->+ (hit pluse in bottom left)
Choose VPN interface and hit Create
Select OpenVPN from the type list and hit Create
Specify the Gateway (public ip or domain name of your vpn server)
Point the User Certificate at the client.crt file
Point the CA Certificate at the ca.crt file
Point the Private Key at the client.key file.

Save that and you’re done.  You should now connect into your VPN and run a few ping and other tests. 

Mac Client

My primary laptop is a Mac, so let’s go there next.  Here you’ll need to install a VPN client application called TunnelBlick.  https://www.tunnelblick.net/

Once you’ve installed the application, you need to dbl-click on your client.ovpn file.  The ovpn file type has been associated with Tunnelblick when it was installed and will open up the file allowing you to add that connection ot your available list.  Once done, simply connect into the VPN and run your tests.

Windows Client

Visit http://sourceforge.net/projects/securepoint and download the windows OpenVPN client.
Launch the Securepoint SSL VPN client, dbl click the tray icon when it appears, and select New. 
Next
Enter Name of your VPN Connection and hit Next
Enter the Public IP or Domain Name of your VPN server, the port you configured (default is 1194) and I prefer TCP connections due to reliability reasons… then hit Next
Point the User Certificate at the client.crt file
Point the CA Certificate at the ca.crt file
Point the Private Key at the client.key file.
Hit Next
Under Advanced Settings
– check the “Comp-LZO” checkbox
– uncheck the “Auth user/pass” checkbox
– leave all others at their Defaults
hit Next
Lastly hit Finish


All done… let me know if you have any questions below.

BigFix Endpoint Command Polling

Command polling is a feature built into every Tivoli Endpoint Manager endpoint.  This feature instructs endpoints to query their relay for new instructions instead of waiting the UDP ping regarding new actions.

This feature is invaluable when it comes to endpoints that are beyond your DMZ or UDP pings are not allowed.  By activating this task, you can speed up the responsiveness of your endpoints in this ping restricted locations.

Look for the “BES Client Setting: Enable Command Polling” task within the BES Support external site.

My DMZ relay is identified when endpoints communicate with my public domain name: bigfix.me.  When the endpoint talks to this relay I would like them to poll for commands every 45 minutes.  When the endpoints switch to talking to a different relay, I would like them to turn off the polling settings.

To do this I will activate two different actions.  One that is targeted at computers talking to my bigfix.me relay.  A second task will have additional relevance to differentiate them and allow me to turn off polling.

Enable Polling

Activate this action choosing the second take action option which allows us to specify the number of seconds… at 2700 or 45 minutes.

Command Polling 1

Command Polling 2

Next we’ll need to copy the “Relay” global property relevance so we can add a bit of logic to our action.

Command Polling 3

Copy the relevance for “Relay” into the clipboard and hit Cancel to close the Manage Properties window.

Command Polling 4

Returning to the Take Action dialog, specify the Preset = Policy   and select “All Computers” as the target.

Command Polling 5

On the “Applicability” tab we’ll want to modify the relevance and add the following to the end of what is there (copied from the Relay global property):

 AND (if ((it does not contain "127.0.0.1" and it does not contain "::1") of name of registration server) then (name of registration server) else if (exists setting "_BESRelay_PostResults_ParentRelayURL" of client and exists value of setting "_BESRelay_PostResults_ParentRelayURL" of client as string) then (preceding text of first "/" of (following text of first "//" of (value of setting "_BESRelay_PostResults_ParentRelayURL" of client))) else "BES Root Server") as lowercase contains "bigfix.me" AND NOT exists setting "_BESClient_Comm_CommandPollEnable" of client

Command Polling 6

After updating the relevance, we’re ready to hit OK to activate this action.

It will run on all endpoints which have “bigfix.me” within the Relay global property.

Disable Polling

Now that we have this feature getting enabled, we’ll want to disable it where it is not needed.  In other words, when endpoints are talking to any other relay except my “bigfix.me” DMZ relay.

Command Polling 7

Under the Target tab, specify all computers, configure Preset = Policy and update the name so we know this will “Disable Command Polling”.

Command Polling 8

Next we’ll move over to the “Applicability” tab as we did before and add the following slightly modified relevance from before (notice the “does not” at the end):

AND (if ((it does not contain "127.0.0.1" and it does not contain "::1") of name of registration server) then (name of registration server) else if (exists setting "_BESRelay_PostResults_ParentRelayURL" of client and exists value of setting "_BESRelay_PostResults_ParentRelayURL" of client as string) then (preceding text of first "/" of (following text of first "//" of (value of setting "_BESRelay_PostResults_ParentRelayURL" of client))) else "BES Root Server") as lowercase does not contains "bigfix.me" AND exists setting "_BESClient_Comm_CommandPollEnable" of client

Command Polling 9

After updating the relevance, we’re ready to hit OK to activate this action.

Now I will start to receive better response from endpoints communicating through my DMZ relay server.

If you have any questions or comments, please add them to the comments section below.

New BigFix Deployment

When you first setup your Tivoli Endpoint Manager (BigFix) deployment, you will want to enable a few analyses.  These analyses will collect data that can be very helpful when managing your infrastructure as well as troubleshooting and adding customizations.

First up is to activate the BES Component Versions analysis…  You can find a shortcut to this under BigFix Management->Deployment Overview

New Deployment 1

Simply Activate this analysis…

New Deployment 2

And the data will start pouring in.  This information will then be read by various dashboards within the product which help you manage your deployment.

New Deployment 3

Another analysis to be activated is the BES Health Checks Analysis.  This will help you analyze the health and configuration of your deployment.  It provides basic information on the components that make up your infrastructure.  You can find the shortcut to this under BigFix Management->Deployment Health Checks

New Deployment 4

Activate this as well…

New Deployment 5

and you’ll start to see data from this analysis as well.  Just like the first analysis, this one will pull in data and feed that to dashboards within the product.

New Deployment 6

Further down on the Deployment Health Checks dashboard in the Deployment Optimization section is a Warning about activating the BES Relay Status Analysis.  Click that shortcut to activate that as well…

New Deployment 7

New Deployment 8

Just as the others, the data will be pulled in for use by various dashboards.

New Deployment 9


If you have any questions or comments, please leave them below.